we show you how to make a solar cooker out of a pizza box. It's relatively simple really, (as long as you get that cheese and grease out of the inside of your pizza box).
This was a really fascinating and simple solar cooker to make, although I'm not sure just yet what we're going to cook in this box. It's kinda little.
Maybe we would use it to bake cookies.
(Actually, you could use this to make eggplant parmesean.)
Just remember that the outside of your box should be airtight, and the inside of your box should be black. Those are the steps that I didn't do in the video.
Hope you enjoy the video and learn how to make a pizza box solar cooker for yourself!
The Eagle Solar Cooker
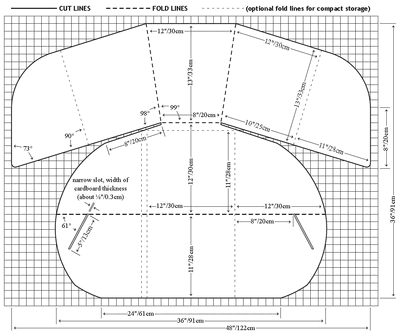
The eagle solar cooker has been my favorite solar cooker to make so far.
Even though there was a little measuring involved, and I messed up when making some of the bottom panels for the cooker, there was no protractor needed, and putting the panels together was very easily done with the duct tape.
I also like how the eagle collapses easily (though the Solar Cookit is supposed to be able to collapse easily too, I didn't figure out how to get it to collapse.
Cardboard (or another material with a reflective surface)
Aluminum foil (if you're using cardboard)
Glue (if you're using aluminum foil)
Razor blade knife
Measuring tape
Duct tape
Cutting surface (optional)
Board (for folding against (optional))
Scoring tool (if you decide to use printing sheets or sheet metal for your cooker).
Background on The Eagle Solar Cooker:
Manda designed "The Eagle", based on the delightful CooKit, with Americans in mind.
Manda is the creator and sponsor of the 2007 Solar Cooker Web Site Contest.
She's also sponsoring the 2008 solar cooker web site contest HERE, which we have entered, and you can too! (When you do, let them know you heard about the contest from GreenJoyment - a little good word never hurts.)
The eagle solar cooker's initial pattern is made out of American standard 8 1/2" X 11" pieces of paper. This method lends versatility: the Eagle can either be made out of one large cardboard sheet or pieced together out of smaller sections. (It gets its name from the vaguely Thunderbird shape when flat.) http://www.thegenieslamp.com/solarcooking/talzcook.bmp http://www.thegenieslamp.com/solarcooking/talzclam1.pdf
Transcription of this video:
Welcome back to Solar Cooker Week! We are here actually in my backyard, Carrie's and my backyard, and we're going to be talking today about a solar collector, a solar cooker called the Eagle. The whole idea around the Eagle is that it's supposed to be very simple for people in America because what it does is....... our sheets of paper the US is 8.5 x 11 where in Europe they're a different measurement. So it's supposed to be very simple to make this just using an outline of a piece of paper.
What I have for this, obviously you see me holding something here, this is a little flat screwdriver and I'm going to use this for scoring the material. This is a razorblade knife and a roll of duct tape; yes, maybe not a hundred percent environmentally-friendly, but very, very useful. And a tape measure, there will be a couple places in this project that we'll need to use a tape measure. And then we have this material, this is a throw-away from a printing company. Now you can probably go to any printing company in a city with more than 50,000 people and they will probably have a sheet like this; they're probably have one that they misprinted or that they just weren't able to use and you'll probably be able to get it for free. It's going to take two sheets of this size to make what we need because we need basically 10 pieces that are 8.5x11 and then we'll cut those down. Then the other thing we have is a cutting surface and that's it! That's basically everything we need for this project.
This is 35 inches by something, but it will make 8 sheets that are 8.5x11; and you'll see me doing that and then I'll be back in just a second.
Ok, so you can probably tell now that I'm in different clothes and that's because we had to run actually when I was doing this the day before so now I'm back and ready to wrap this up!
It took me about 20 minutes to cut all of these out and I now have ten of these sheets that are 8.5 inches by 11 inches which works really well for us because we're used to measuring things in inches. Now what I'm going to do is just follow my instructions; very, very simple as far as getting these things put down.
It's a little cooler today and I'm absolutely getting chewed by mosquitoes. I just got bit about 8 times in 4 minutes. So we're going to do the rest of this project inside.
One thing you might also find helpful is a board, something with a straight edge on it so that you can actually cut against it. The board also works really well for folding against.
And once again, be very careful while you're doing this because you can get little slivers of the metal in you.
5 minutes later .... (I messed up)
Ok, we're going to start again. On the counter you can see that I've got this panel that I cut for this side and I cut the other side the same way - while I should have cut it the other direction so that it would have been correct if I have flipped it this way and then cut it the other way. I really could save myself a whole lot of time if I measured twice and cut once as my Dad used to teach me ... thanks Dad! Yeah....
So we also have the same challenge on cutting one piece for this side. Now it ends up .... I mean both sides end up being the right size here - this is kind of a challenge over here. So what I'm going to instead of remaking those pieces is I'm actually going to cover them in foil just like you would do if you were using just regular cardboard - I don't have to remake them that way. This little crack right here? That's going to be fixed with duct tape!
So it's wearing over and over and over, back and forth with the razor blade, back and forth. I am through them now so you're getting blinded by this panel and how much light it gives off, which is awesome! It shows that it will actually put off a great reflection when the sun shines on it.
Now we have all of the pieces we need for making our Eagle Solar Cooker. I'm going to have to cover this one in aluminum foil and I'm going to have to cover this one in aluminum foil. Alright, so this is just some old aluminum foil that we have from something we cooked - I don't even know what it's from. But I'm just going to lay it out here over the top of this and there, now the piece is all covered. Now it's going to be better if you can smooth it out a little bit so the reflective surface will be a little better but on the other hand, I'm putting fingerprints all over it which is making the reflective surface not as good. So there we have a perfectly reflective piece and now, for the 8th wonder of the universe, the magic of duct tape!
Made all of these seams so once again it will hold together. I think I did it! That's what it's supposed to look like; so I'm going to tip this forward here so you can actually see it - our solar cooker. Our Eagle Solar Cooker - and thanks to the man for inventing this Eagle Solar Cooker. It was relatively simple and I'm going to go grab a pot and we can see what that looks like.
In all of the instructions I've read about solar cookers, they tell you to find a "cooking vessel" - "make sure you've got a good cooking vessel"....like a pot?! Ok, I'll find a good pot. Well, as you saw in another video, we went to Goodwill and found some old stuff and some old pots. This is actually an old peanut butter jar that we painted black and then we scraped the side of it so that we can actually see inside -- hopefully that's the idea - see inside when it's boiling so that we can tell if the water's actually boiling or not. Just our little "litmus test" to see if the thing actually works. So that's what we use.
So as I understand it, here's how this works. You take the jar -- or the "cooking vessel" and you take some sort of wire frame and you put it inside of a cooking bag. Now this is just a standard oven cooking bag. Apparently there's other kinds of bags you can use, but these were cheap and easy to find and that's what they said would work so that's what we're using. So you take the wire frame, I showed you how I make these in another video -this just an old tomato cage wire. As I understand it, you don't really want this, the cooking part, to touch the bag. You want as much air space around whatever you're using for cooking as possible. And then hopefully your jar stays up, or your cooking vessel, or your pot, or whatever it is and you want to make sure that you've got a good solid base for it. Then fill the space around the jar with air ... and there it is and it's set to cook!
You can basically put whatever you want in that jar, but you going to put something like you'd put in a crock pot. But we're going to find out if these things actually work in a later video. So make sure you visit the link at the end of this video if you're not already there and see what happens when we compared, side- by-side, multiple solar cookers on the same day to see what happens and which one's best.
Hope you've enjoyed this video; it might take you an hour, an hour and a half the first time you do it. But, if you get free cooking out of it, it's probably worth the hour, the hour and a half to invest in to trying it out. So thanks for watching the video and make sure you check out the next one because we're going to show you how this thing actually works and if it actually cooks something.
Possibly because making one of these for the first time requires a protractor, or some other math tool that I just don't have anymore (and never really used in high school anyway).
Perhaps I should have been a better math student. (I even LIKED geometry - it's just been so long since I've used it.)
In any case, I don't think the science has to be quite 100% exact for you if you make a solar cookit. And trust me, if I can make a solar cookit, anyone can make one.
Over 5,000 of them are being used in the Iridimi Camp (where over 17,000 refugees from Darfur live at present) and it's hard to believe, but these Solar Cookit Cookers have changed thousands of lives there. (More about that below.)
To make a solar cookit, you will need:
Tape Measure
Razor Blade Knife
Cardboard and aluminum foil (or another material works too - watch the video!)
And, if you're interested, we find this solar cooking project (using solar cookits for refugees from Darfur at the Iridimi Refugee Camp) to be absolutely amazing.
There's a video about this first, and then the story follows:
(If you'd like to help, there's also a link below.)
From http://solarcooking.wikia.com/wiki/Iridimi_Refugee_Camp
Since early 2005, Solar Cookers International (SCI) has partnered with the KoZon Foundation and Jewish World Watch to provide solar cookers and related training to Darfur refugees living in the Iridimi Refugee Camp. Located in Chad, the camp houses 17,000 refugees that fled the Darfur region of Sudan. Gender-based violence during firewood collection was one factor leading to the displacement of Darfur's population.
Iridimi camp administrators have distributed improved wood stoves and kerosene cookers to the refugees, but these devices still rely on scarce or expensive energy sources. Solar cookers not only reduce dependence on these fuels by about one-third, but also decrease health risks associated with smoky cooking fires and lessen the risk of physical violence that women and children face while venturing outside the camp to gather firewood. Equally important is the capability of solar cookers to pasteurize drinking water, reducing incidence of water-borne diseases, especially in children.
Groups of five or six people learn to solar cook by attending five-day instructional workshops, led by one of 32 certified trainers. Once trained, the new solar cooks receive two CooKits -- enough to cook grains and sauce at the same time. A CooKit production workshop was completed in early 2006, and since then women have earned income assembling CooKits and conducting trainings. As of June 2007, all of the 4669 families in the Iridimi camp are successfully using solar cookers (ca. 17,000 individuals).
Now replacement cookers will be provided for the families every six months. Families are made up of 5-7 people per tent, often one woman, head of household, with up to three of her own children and three orphans. The refugee women in Iridimi camp have persevered in pushing forward this solar cooking project even as the security situation has grown increasingly unstable.
Organizations providing financial support for this project have included: Netherlands Refugee Foundation, Jewish World Watch, the Darfur Assistance Project, the Dora Levit Family Fund, and the Hesed Fund. Logistical and communications support from UNHCR and CARE is invaluable in continuing project operations.
Transcription of "How to Make a Solar Cookit":
We're going to use a different material this time for this cooker and I printed out the instructions and you'll see I printed them on the back of some old paper here; Carrie's old flute music actually, when she played flute in high school. Here on the back are the instructions. We're going to use a different material though, I'm going to explain what that is, so we'll go grab that now.
So as I mentioned, I've got my instructions and I've got a tape measure which is going to be very helpful for me. I've got a razorblade knife and then I've got a little tool for marking on the material that I'm going to use. Now you can use a pencil as well but the reason that I'm using this little tiny screwdriver, a flathead screwdriver is because the material that we're actually using ... this thing. What is this stuff? Well, Carrie used to work at a printing company and I imagine if you went to any big printing company in your town, you could probably get these old sheets, they actually use these for printing paper. But when they're done with them, a lot of times they just get thrown out and a lot of times they get messed up in the process - they'll be some that will just be messed up. Well, Carrie used these on our kitchen cabinets when we first moved in we wanted a different look on our kitchen cabinets. So she had this great idea that we could take these -- that they were just going to throw out anyway -- and we could use them on the kitchen cabinets.
So we're going to use these actually to create our solar cooker - you'll see how we're going to do that. But basically you could probably get these from any printing company in your local area for free; if not, at a very, very small cost.
The other thing we have is a cutting surface and this is just some old stuff that we actually tore out of the kitchen. One small challenge I'm noticing is that these plans call for a piece of cardboard that you would actually line with foil. They call for a piece of cardboard that is 48 inches by 36 inches. My panels here are not 48 inches by 36 inches. I do have one side which is 35 inches so we're going to use that as the long side. So we're going to have to take two of them and put them together and use that to make our cooker.
Now as I'm doing this, I'm realizing that I'm putting smudges all over this plating which is ultimately going to make it not work as well. So I'm actually going to flip it over so that I can work on the other side so that I don't smudge the reflective surface. We'll actually probably have to clean it anyway, but I don't need the smudges so I'm going to flip it over and start measuring on that side.
You can see on this side of the metal, my marks actually show up much better. So if you can see that in the camera, you can see I can actually cut now with these marks that are showing up there. So I think we're ready to start cutting.
Now here's the crazy thing - you don't have to even be that good at this stuff - I just totally screwed this thing up! I'm going to do it anyway and see if we can't fix it. We'll see what happens in the end.
So these are my neighbors, Jeff and Dallas....
So obviously you can see that I screwed this one up just a little bit because I was cutting the lines on the ground, I'll hold these up to the camera so you can see. I made several cuts along here and kind of messed up the front of the surface here - I don't know if you can see that, but where I cut in the wrong place - it's going to be like another reflective surface which isn't really the best for what you want here. So what this is going to do actually and hopefully I'm not blinding you too much, but this is going to become our pattern for all of the ones that I'll make in the future. Maybe I'll get it done and my neighbors will think it's cool and they'll want one too.
But once you get this cut into a pattern that's right - you can basically just take and peel it on the cut that you made. So this is a piece you can hold on to for later use. And again, not the best cutting job, Be careful by the way because these edges will become very, very sharp once you cut them so you'll want to be careful or otherwise you might cut yourself.
Now honestly, if I wasn't making this for a video I'd probably say that's a good enough surface. But because I'm making it for a video, this is going to become my pattern for the next one that I'm going to make.
We have a few extra inches; we'll pull them off along the creases that I created, along the cuts that I made and again being careful because you can cut yourself very easily doing this. Here we have the bottom of our solar cooker. Now it's time to make the top. But as you can see, it's getting pretty cloudy. It's looking a little green around here ... we do get tornados in the summer in Colorado so we're going to go inside.
So now you're getting the inside view of the garage; maybe not completely safe in here if it's bad weather outside.
We're going to flip this over and now I'm going to do the measurements again and hopefully this time I'll get them right the first time! And I'm realizing as I do this now, this isn't going to work with just one panel. For the back I'm going to have to make three different panels because these pieces here aren't big enough to do what I need to do. So, I'm going to have to make three different pieces and then figure out some way of putting them together. So I'm going to go ahead and carry these out now and we're going to try to put together at least the back panel portion of our solar cooker.
So here's what we have. There's going to be those three pieces and what's going to happen is this center piece is going to fit inside of the other two and it's going to get it's reflection from this lower panel. Now I need to go ahead and score this lower panel so that I can fold it. You can see that I've already done that here and I'm kind of getting the rest of my panels dirty, so I'm going to have to clean this before I actually put it together. So I'm going to go ahead and fold this; now, I'm going to need to cut some slots in this at some point so that it will hold these little side wings. Ultimately this is going to be a lot easier for you if you just cut out it out of one piece of cardboard.
We're going to go ahead and fold this piece here and then figure out where we need to make the holes for it to insert in to. They do show here on the diagram where you're supposed to put the holes. In theory, I should be using a protractor for this; you know those little things you used in high school and didn't think had any real practical purpose? That would be me! Yes, I should be using a protractor but I'm not, I'm just eyeballing it which is probably not the way to do this. So one more thing you should use in this project? A protractor.
We've got the whole thing cut now and basically all we need to do is go ahead and fold this and go ahead and put the whole thing together.
I wish I could tell you this project was easy and straightforward and simple and you could just do it - but I'm into this project about four hours at this point and ... I'm going to use duct tape! I'm not exactly sure what else to do to get the thing to hold together and still use the materials that I have at home. I have duct tape and I may as well use it because I already bought it. If anyone has an issue with that, sorry, but I'm going to use duct tape.
So for all of you that saw that I didn't use a protractor and could have - sorry! Thank you for watching anyway!
So here's what I did; I actually had to cut these slots a little higher up. These here are probably not good for making this really solar-friendly, but there's only one of them so it's ok.
We'll put the pot and the wire stand inside of a plastic cooking bag -that's what we'll use when we actually use this solar cooker for cooking our food.
So again, I wish I could tell you it was easy - but it wasn't! It took some time and I think I kind of screwed up in the process, but it works. We'll find out if it actually works - if it actually does what it's supposed to do when we do our cooking test with it.
Thank you for taking the time to watch this video and make sure you go and watch the results of what happens when we actually use this to cook.
In this video, I am going to teach you how to make a solar funnel cooker.
For this cooker, you will need:
Aluminum foil
Glue
Cardboard (I got some heavy duty cardboard, which was very difficult to fold)
A razor blade
A cutting surface (optional)
A measuring tape (optional)
Brads, bolts and nuts, screws, wire, or some other material that will hold things together (watch the video to see what I mean)
Straight edge (like a board) for forming creases)
(I actually mess up in the video and call this the "box solar cooker" but decided not to edit/re-record it)
I thought that it was kind of cool when I was picking this cardboard up at the grocery store, I got to chatting with the guy who was helping me to get the cardboard, and he asked me what it was for.
I said "for cooking food."
You should have seen the puzzled look on his face.
I went on to tell him about being able to line the cardboard with foil and that with a black pot and a glass bowl, we would be able to cook whatever we wanted.
He was absolutely amazed.
(If you're watching this video, hi Mike!)
This cooker comes from Steven E. Jones, Professor of Physics at Brigham Young University (BYU), and no doubt a great team who helped him in the process of creating a variety of funnels for solar cooking!
Transcription of this video:
GreenJoyment.com presents:
How to Make your Own Solar Cooker
Today we're actually going to be making our first solar cooker and what's more appropriate to start with than the BOX (I meant funnel) Solar Cooker which you can find at SolarCooking.org. So for this project, let's go ahead and get started.
We're going to need some wire or some other kind of fastener - you'll see why in a second. You're also going to need some aluminum foil - no product endorsement necessary here, just showing you that you'll need some aluminum foil. You'll also need glue, this is just the glue we had; you can use whatever you wanted, rubber cement or anything like that. Also you're going to need a tape measure and you're going to need a razor blade knife. You're also going to want to use some cardboard - you can get cardboard for free basically anywhere, but you're going to want to use some cardboard that has a side that's twice as long on one side as on the other side. So what I did is I went and got this big piece of cardboard, you can see its thick cardboard and it's huge. This is what they use to hold watermelons at the grocery store and they just get rid of it or recycle it later.
The other two things that you're going to want is some sort of solid surface for folding against and then you're going to want some sort of surface that you can actually cut on.
So we are going to go ahead and get started!
Alright, so I've got a piece now that's 2 feet by a little bit longer than 4 feet and what I'm going to do is cut a hole out of the middle here so that we can actually use this as the base for putting our solar funnel cooker together.
Normally the hole that you cut in the bottom here you would want to have it be the diameter of whatever your cooking pot is when it's put together. But since I don't know what my cooking pot is going to be - I'm just going to cut a smaller size half-circle so that I can actually make this thing form into a funnel.
Now, before I put glue on it and put the aluminum foil on it, I want to make creases into the cardboard so I don't have to try to do that after I put the foil on. So I'm going to go ahead and make creases in the cardboard. Now that's where this board is going to come in super handy for me!
So this probably would have been easier to bend than this -- if you actually used a thinner cardboard, but if you end up getting this cardboard, just be prepared - it may take some strength to get the thing to bend into the shape that you want. But it will end up being in this sort of a shape. Then you've got to lay it back down flat and this is where we're going to put the aluminum on.
So, rubber cement might work better for you if you decide to use rubber cement, or you can take some Elmer's Glue and thin it out. But we just have this glue so this is what we're going to use. I'm just going to spread this out all over the cardboard and then I'm going to lay out the aluminum foil and just do it in one strip at a time, get that laid out and flat and then I'll overlap it with another layer and then we will have the whole thing pretty much ready to go.
By overlapping the pieces of aluminum foil by about an inch, an inch and a half, maybe two inches - we just going to go ahead and wrap up with the rest of the aluminum foil here.
Ok, so we've got all of our aluminum on here - the whole thing's covered as you can see and what we'll need to do now is go ahead and tie the ends together. So we're going to take this and we're going to fold it in along the creases that we just made so these ends will actually match up. Then we're going to tie them together and we will have made our solar funnel cooker! Relatively simple, right? We're about twenty-five minutes into this ... maybe not even that - maybe 20 minutes into this project at this point and have got maybe 5 or 8 minutes more to go. We're going to go ahead and let this glue dry and I will record the rest, you'll probably see me inside, doing the rest of this tying these ends together and then showing you how it works to cook the food.
Now if I wanted to I could hold this together with screws or with bolts; you know, put a bolt through and a washer on the other side and hold it with a nut and I may end up doing that eventually but for now we'll just tie it together. We are going to just use some everyday, common simple wire to hold it together.
Alright, I eventually decided the wire wasn't working because I wasn't getting a wide enough angle inside of the funnel here and so what I decided to do is go ahead and use a bolt and you can probably see that right there to go ahead and hold this together and I'm going to hold it together with a couple of other bolts. I'm just using some stuff I've got around the house here.
The thing I've learned doing this project, is that your creases that you make are super important. I should have made this crease much stronger - the one going to the corner because that's going to determine just how wide of an angle I will get when I'm actually using this in the funnel.
So once you get the whole thing done, it fits inside of a box. So ours in this case, is going to fit inside the box just like this and I'll tip it up here so you can see it, but it will sit inside of the box just like that. We'll put some rocks inside of the box to weight this down a little - with the heavier cardboard, this is pretty heavy. That's what we'll use to cook our food!
This is Day One of Solar Cooker Week - stay tuned because tomorrow we've got another awesome solar cooker coming at you and then at the end of all of this, we're going to make four solar cookers; and when we've got all of them put together, we are going to basically have a cook-off.
We're going to compare, side-by-side, four different solar cookers cooking the same thing, we're going to use all the same stuff, to see which one tastes the best, which one cooks the quickest and any other interesting information we can find out about these different solar cookers. So thank you for joining us! There's a link right below me here that's where as soon as we wrap up all of these solar cookers, you'll find out the results of what happened when we compared the different solar cookers.
So we'll see you very soon at GreenJoyment.com and if you're already here, thanks for visiting and come back at the end of the week and we'll have the results of our solar cookers to see which one performed the best.