GreenJoyment | Solar Cooking and Solar Cookers
How To Make An Eagle Solar Cooker »
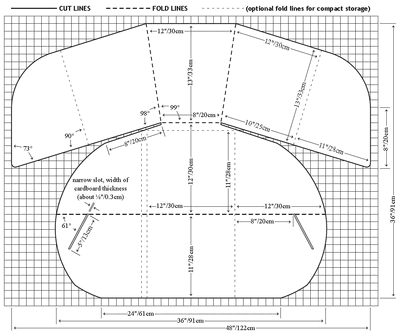
How to Make a Solar Cookit (From Aluminum Sheets)
Posted by Jonathan
I found this project to be rather difficult.
Possibly because making one of these for the first time requires a protractor, or some other math tool that I just don't have anymore (and never really used in high school anyway).
Perhaps I should have been a better math student. (I even LIKED geometry - it's just been so long since I've used it.)
In any case, I don't think the science has to be quite 100% exact for you if you make a solar cookit. And trust me, if I can make a solar cookit, anyone can make one.
Over 5,000 of them are being used in the Iridimi Camp (where over 17,000 refugees from Darfur live at present) and it's hard to believe, but these Solar Cookit Cookers have changed thousands of lives there. (More about that below.)
To make a solar cookit, you will need:
- Tape Measure
- Razor Blade Knife
- Cardboard and aluminum foil (or another material works too - watch the video!)
- Marking tool (Pencil or otherwise)
- Protractor (IMPORTANT!)
- Cutting surface
- Straight edge (for cutting and/or folding against)
And, if you're interested, we find this solar cooking project (using solar cookits for refugees from Darfur at the Iridimi Refugee Camp) to be absolutely amazing.
There's a video about this first, and then the story follows:
(If you'd like to help, there's also a link below.)
From http://solarcooking.wikia.com/wiki/Iridimi_Refugee_Camp
Since early 2005, Solar Cookers International (SCI) has partnered with the KoZon Foundation and Jewish World Watch to provide solar cookers and related training to Darfur refugees living in the Iridimi Refugee Camp. Located in Chad, the camp houses 17,000 refugees that fled the Darfur region of Sudan. Gender-based violence during firewood collection was one factor leading to the displacement of Darfur's population.Iridimi camp administrators have distributed improved wood stoves and kerosene cookers to the refugees, but these devices still rely on scarce or expensive energy sources. Solar cookers not only reduce dependence on these fuels by about one-third, but also decrease health risks associated with smoky cooking fires and lessen the risk of physical violence that women and children face while venturing outside the camp to gather firewood. Equally important is the capability of solar cookers to pasteurize drinking water, reducing incidence of water-borne diseases, especially in children.
Groups of five or six people learn to solar cook by attending five-day instructional workshops, led by one of 32 certified trainers. Once trained, the new solar cooks receive two CooKits -- enough to cook grains and sauce at the same time. A CooKit production workshop was completed in early 2006, and since then women have earned income assembling CooKits and conducting trainings. As of June 2007, all of the 4669 families in the Iridimi camp are successfully using solar cookers (ca. 17,000 individuals).
Now replacement cookers will be provided for the families every six months. Families are made up of 5-7 people per tent, often one woman, head of household, with up to three of her own children and three orphans. The refugee women in Iridimi camp have persevered in pushing forward this solar cooking project even as the security situation has grown increasingly unstable.
Organizations providing financial support for this project have included: Netherlands Refugee Foundation, Jewish World Watch, the Darfur Assistance Project, the Dora Levit Family Fund, and the Hesed Fund. Logistical and communications support from UNHCR and CARE is invaluable in continuing project operations.
Transcription of "How to Make a Solar Cookit":
We're going to use a different material this time for this cooker and I printed out the instructions and you'll see I printed them on the back of some old paper here; Carrie's old flute music actually, when she played flute in high school. Here on the back are the instructions. We're going to use a different material though, I'm going to explain what that is, so we'll go grab that now.
So as I mentioned, I've got my instructions and I've got a tape measure which is going to be very helpful for me. I've got a razorblade knife and then I've got a little tool for marking on the material that I'm going to use. Now you can use a pencil as well but the reason that I'm using this little tiny screwdriver, a flathead screwdriver is because the material that we're actually using ... this thing. What is this stuff? Well, Carrie used to work at a printing company and I imagine if you went to any big printing company in your town, you could probably get these old sheets, they actually use these for printing paper. But when they're done with them, a lot of times they just get thrown out and a lot of times they get messed up in the process - they'll be some that will just be messed up. Well, Carrie used these on our kitchen cabinets when we first moved in we wanted a different look on our kitchen cabinets. So she had this great idea that we could take these -- that they were just going to throw out anyway -- and we could use them on the kitchen cabinets.
So we're going to use these actually to create our solar cooker - you'll see how we're going to do that. But basically you could probably get these from any printing company in your local area for free; if not, at a very, very small cost.
The other thing we have is a cutting surface and this is just some old stuff that we actually tore out of the kitchen. One small challenge I'm noticing is that these plans call for a piece of cardboard that you would actually line with foil. They call for a piece of cardboard that is 48 inches by 36 inches. My panels here are not 48 inches by 36 inches. I do have one side which is 35 inches so we're going to use that as the long side. So we're going to have to take two of them and put them together and use that to make our cooker.
Now as I'm doing this, I'm realizing that I'm putting smudges all over this plating which is ultimately going to make it not work as well. So I'm actually going to flip it over so that I can work on the other side so that I don't smudge the reflective surface. We'll actually probably have to clean it anyway, but I don't need the smudges so I'm going to flip it over and start measuring on that side.
You can see on this side of the metal, my marks actually show up much better. So if you can see that in the camera, you can see I can actually cut now with these marks that are showing up there. So I think we're ready to start cutting.
Now here's the crazy thing - you don't have to even be that good at this stuff - I just totally screwed this thing up! I'm going to do it anyway and see if we can't fix it. We'll see what happens in the end.
So these are my neighbors, Jeff and Dallas....
So obviously you can see that I screwed this one up just a little bit because I was cutting the lines on the ground, I'll hold these up to the camera so you can see. I made several cuts along here and kind of messed up the front of the surface here - I don't know if you can see that, but where I cut in the wrong place - it's going to be like another reflective surface which isn't really the best for what you want here. So what this is going to do actually and hopefully I'm not blinding you too much, but this is going to become our pattern for all of the ones that I'll make in the future. Maybe I'll get it done and my neighbors will think it's cool and they'll want one too.
But once you get this cut into a pattern that's right - you can basically just take and peel it on the cut that you made. So this is a piece you can hold on to for later use. And again, not the best cutting job, Be careful by the way because these edges will become very, very sharp once you cut them so you'll want to be careful or otherwise you might cut yourself.
Now honestly, if I wasn't making this for a video I'd probably say that's a good enough surface. But because I'm making it for a video, this is going to become my pattern for the next one that I'm going to make.
We have a few extra inches; we'll pull them off along the creases that I created, along the cuts that I made and again being careful because you can cut yourself very easily doing this. Here we have the bottom of our solar cooker. Now it's time to make the top. But as you can see, it's getting pretty cloudy. It's looking a little green around here ... we do get tornados in the summer in Colorado so we're going to go inside.
So now you're getting the inside view of the garage; maybe not completely safe in here if it's bad weather outside.
We're going to flip this over and now I'm going to do the measurements again and hopefully this time I'll get them right the first time! And I'm realizing as I do this now, this isn't going to work with just one panel. For the back I'm going to have to make three different panels because these pieces here aren't big enough to do what I need to do. So, I'm going to have to make three different pieces and then figure out some way of putting them together. So I'm going to go ahead and carry these out now and we're going to try to put together at least the back panel portion of our solar cooker.
So here's what we have. There's going to be those three pieces and what's going to happen is this center piece is going to fit inside of the other two and it's going to get it's reflection from this lower panel. Now I need to go ahead and score this lower panel so that I can fold it. You can see that I've already done that here and I'm kind of getting the rest of my panels dirty, so I'm going to have to clean this before I actually put it together. So I'm going to go ahead and fold this; now, I'm going to need to cut some slots in this at some point so that it will hold these little side wings. Ultimately this is going to be a lot easier for you if you just cut out it out of one piece of cardboard.
We're going to go ahead and fold this piece here and then figure out where we need to make the holes for it to insert in to. They do show here on the diagram where you're supposed to put the holes. In theory, I should be using a protractor for this; you know those little things you used in high school and didn't think had any real practical purpose? That would be me! Yes, I should be using a protractor but I'm not, I'm just eyeballing it which is probably not the way to do this. So one more thing you should use in this project? A protractor.
We've got the whole thing cut now and basically all we need to do is go ahead and fold this and go ahead and put the whole thing together.
I wish I could tell you this project was easy and straightforward and simple and you could just do it - but I'm into this project about four hours at this point and ... I'm going to use duct tape! I'm not exactly sure what else to do to get the thing to hold together and still use the materials that I have at home. I have duct tape and I may as well use it because I already bought it. If anyone has an issue with that, sorry, but I'm going to use duct tape.
So for all of you that saw that I didn't use a protractor and could have - sorry! Thank you for watching anyway!
So here's what I did; I actually had to cut these slots a little higher up. These here are probably not good for making this really solar-friendly, but there's only one of them so it's ok.
We'll put the pot and the wire stand inside of a plastic cooking bag -that's what we'll use when we actually use this solar cooker for cooking our food.
So again, I wish I could tell you it was easy - but it wasn't! It took some time and I think I kind of screwed up in the process, but it works. We'll find out if it actually works - if it actually does what it's supposed to do when we do our cooking test with it.
Thank you for taking the time to watch this video and make sure you go and watch the results of what happens when we actually use this to cook.

 Facebook - Jonathan
 Twitter - Jonathan
 Linked In - Jonathan
 Our YouTube Channel
Comments
Congratulations for the won web page award. It reached the right people.